In the previous post we looked at the definition of interfaces and the benefits related to them, both in general and declined to the LabVIEW world. This post takes up the concepts seen by illustrating a real-world example on the use of interfaces and classes. The goal of the post is to provide more insights and tools for using interfaces with real problems.
Requirements
Let’s suppose we need to develop an application for managing an air quality monitoring station. The requirements are:
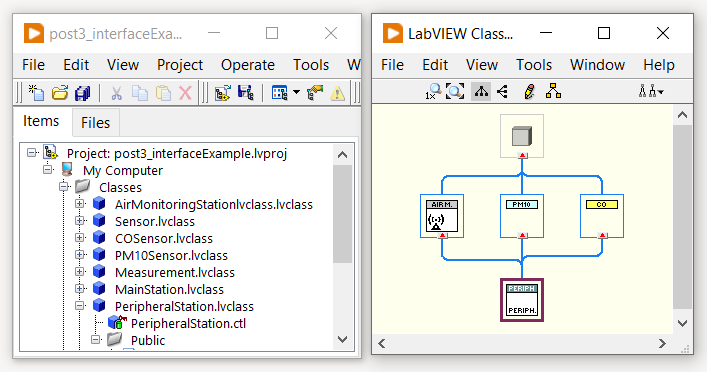
- The application manages an air quality monitoring station (main station), to which sensors and another peripheral station are connected.
- The application reads values of PM10 and carbon monoxide CO concentration at a specific rate.
- The application reads from two sensors connected to the main monitoring station. These sensor are a PM10 particle sensor and a carbon monoxide CO sensor.
- The application reads PM10 and CO values acquired from the peripheral monitoring station.
- The application logs all the acquired data in the system console.
- The application is open to extensions such as support for other types of sensors and other logging modes.
Design
Now that we have the application requirements, let’s move on to the design of classes and interfaces.
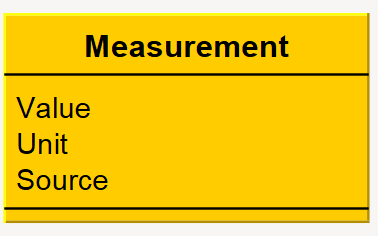
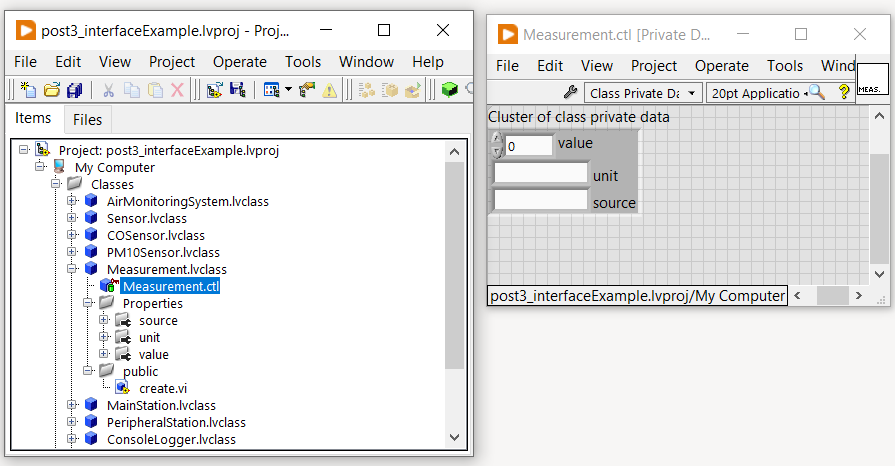
First, we define the Measurement class used to contain all the data related to a measurement: value, unit of measurement, and the source of the measurement data.
Let’s now turn to the logging part.
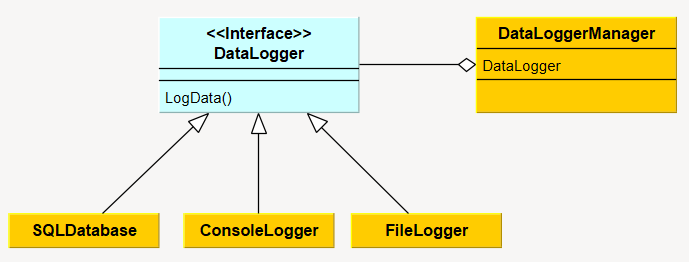
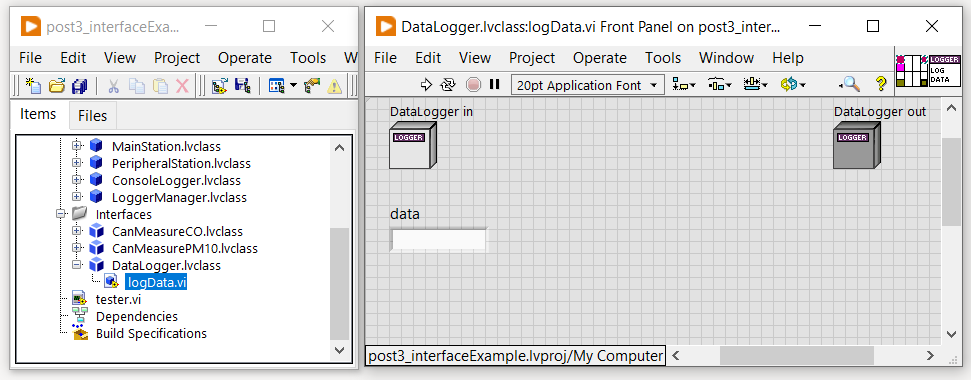
The requirements ask that we log the acquired data in the system console. We therefore create the DataLogger interface that defines the LogData method and the ConsoleLogger class that implements that interface. The use of the DataLogger interface makes the application open to other logging modes. As an example, we also define the SQLDatabase and FileLogger classes. Both implement the DataLogger interface.
We then define the DataLoggerManager class, which is responsible for managing data logging. The DataLoggerManager class has an attribute of type DataLogger (composition relation). Thus, since the DataLoggerManager class depends on the DataLogger interface and not on a concrete class, it is possible to change logging modes by injecting any object that satisfies the DataLogger interface.
Below is the UML diagram of the DataLogger interface, the classes that implement it, and the DataLoggerManager class.
We now proceed by defining the architecture related to sensors.
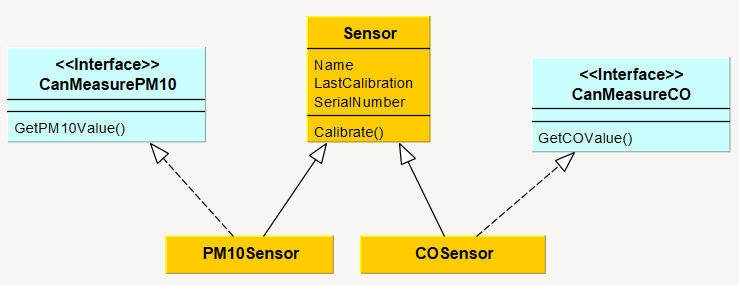
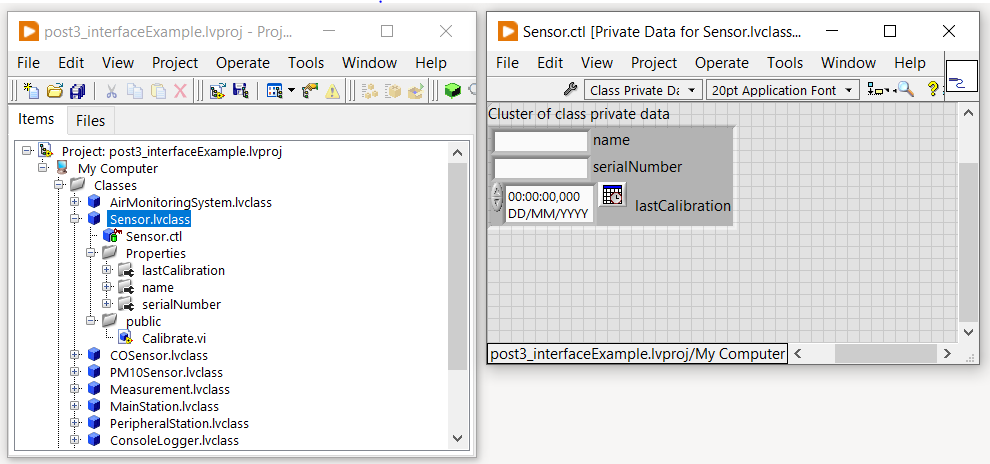
We define the base class Sensor that has attributes such as Name (sensor name), Serial Number, LastCalibration (last calibration date), and methods such as Calibrate. Note that, with the exception of Name, the members of the Sensor class do not serve to satisfy the requirements given above. Instead, they serve to make the example closer to a real-world application.
We then represent PM10 particles and CO carbon monoxide sensors by means of two concrete classes derived from Sensor. The two classes are the PM10Sensor and COSensor classes, respectively.
The ability of the two sensors to acquire the concentration value of PM10 and CO in the air is not defined in the Sensor class. Instead, two dedicated interfaces are defined:
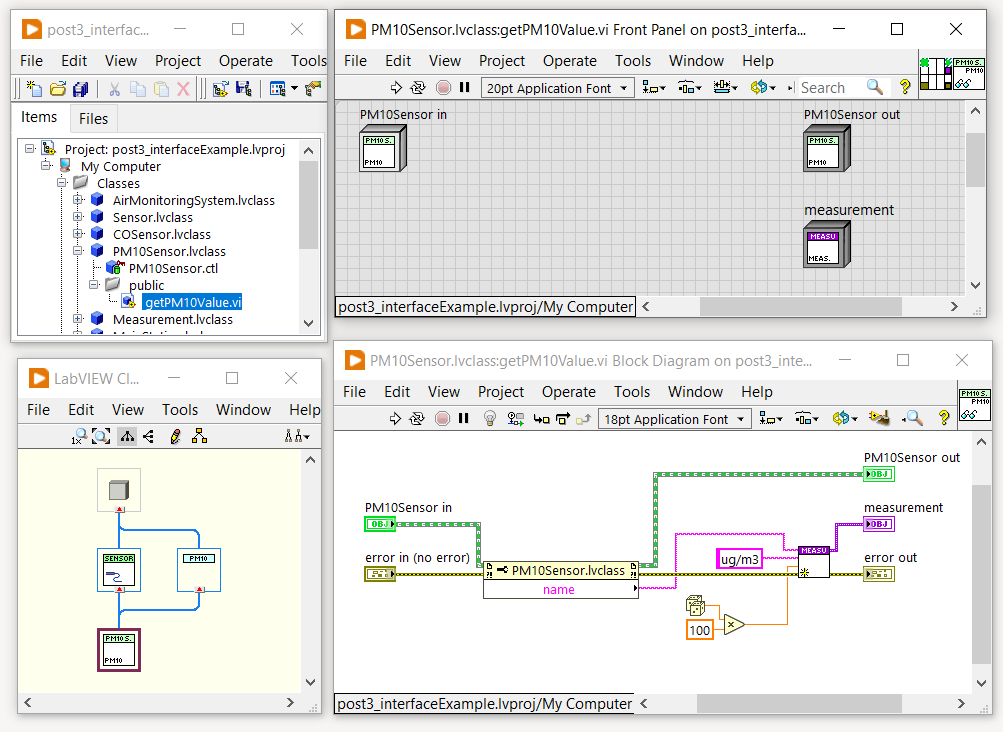
- CanMeasurePM10 which defines the GetPM10Value method.
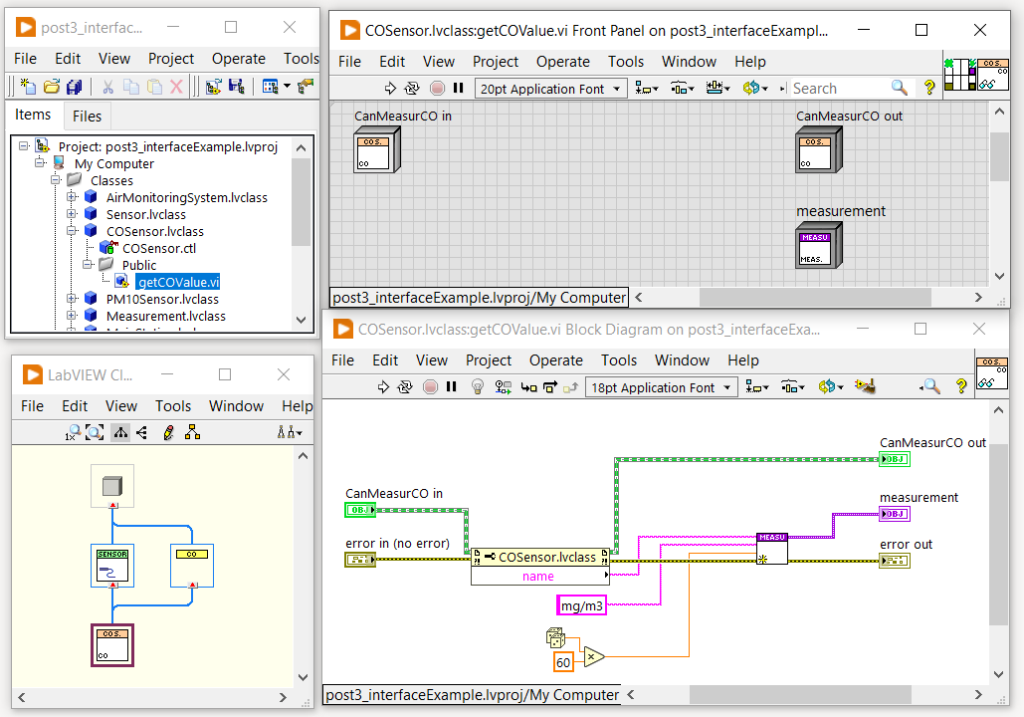
- CanMeasureCO which defines the GetCOValue method.
Using the two interfaces above, the two classes that model the two types of sensors will implement only the interface they actually satisfy. The PM10Sensor class in fact implements the CanMeasurePM10 interface and the COSensor class implements the CanMeasureCO interface.
With this approach, if we were to add a new type of sensor capable of acquiring both PM10 and CO concentrations, we would create a new class that would implement both interfaces. Also, if we were to acquire a new data type in the future, we would create a new dedicated interface without touching the existing code. This satisfies one of the requirements specified above.
Below is the UML diagram of the classes that model the sensors and their associated interfaces.
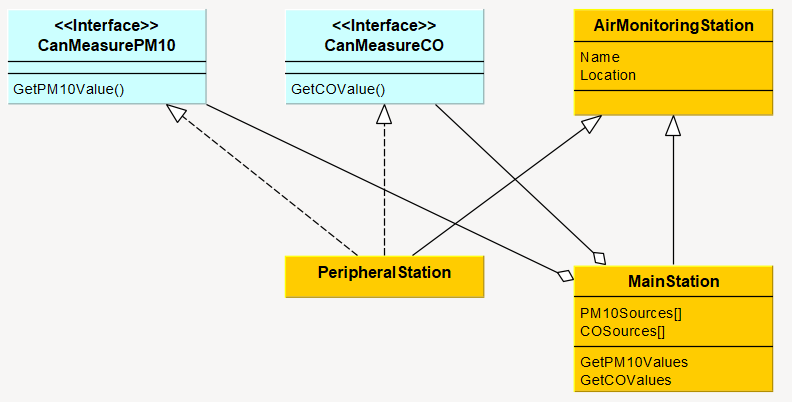
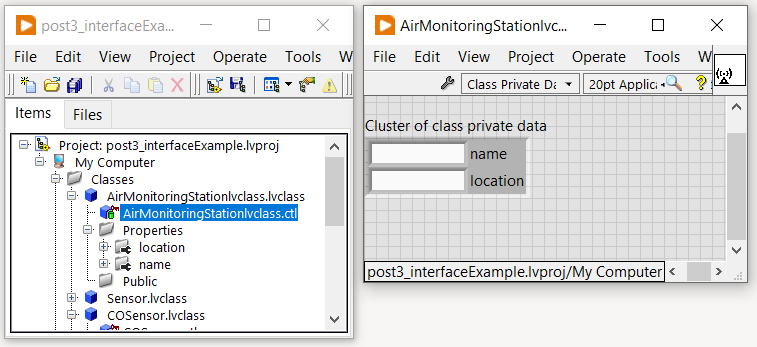
We conclude the design of classes and interfaces by modeling the monitoring stations. We again provide a base class (AirMonitoringStation) and two derived classes: MainStation and PeripheralStation.
The AirMonitoringStation class defines the properties Name (which is a representative name for the station) and Location (which indicates the location of the monitoring station). Once again, note that the Location property is not necessary for meeting the requirements but makes the current example more concrete.
As per the requirements, the peripheral station is able to provide the main station with PM10 and CO concentration values. From the data acquisition point of view, therefore, the peripheral station has the same role as the two PM10 and CO sensors. For this reason and to simplify the work at the main station, we take advantage of the same interfaces used for the two sensors. Since the peripheral station provides both PM10 and CO concentration values, the PeripheralStation class implements both interfaces: CanMeasurePM10 and CanMeasureCO.
The MainStation class is responsible for reading PM10 and CO values from the data sources it handles (i.e., from the sensors and the peripheral station). Through the use of interfaces, the MainStation class does not depend on the concrete classes but on the interfaces themselves, thus decoupling the concrete classes reciprocally and making the application more flexible, easier to maintain, and testable.
The MainStation class, therefore, has in its attributes two lists whose elements are CanMeasurePM10 type and CanMeasureCO type, respectively. In addition, the class has two dedicated methods for reading PM10 and CO values from all the data sources it handles. These methods are: GetPM10Values and GetCOValues.
Below is the UML diagram of the classes that model the monitoring stations and the interfaces involved.
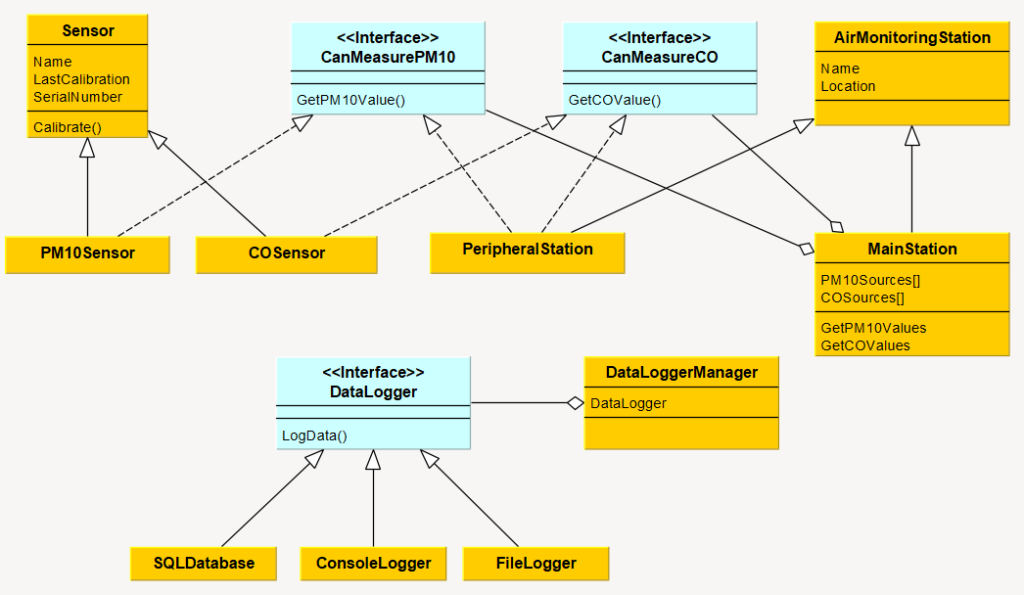
Finally, the UML diagram below shows all the defined classes and interfaces and their relationships. For an easier reading of the diagram, the Measurement class is not reported.
Inplementation
We implement the classes and interfaces designed above step by step. In particular, I report code snippets and screenshots for both LabVIEW and C# versions.
Let’s start from the Measurement class:
{
public double Value { get; set; }
public string Unit { get; set; }
public string Source { get; set; }
public Measurement(double value, string unit, string source)
{
this.Value = value;
this.Unit = unit;
this.Source = source;
}
}
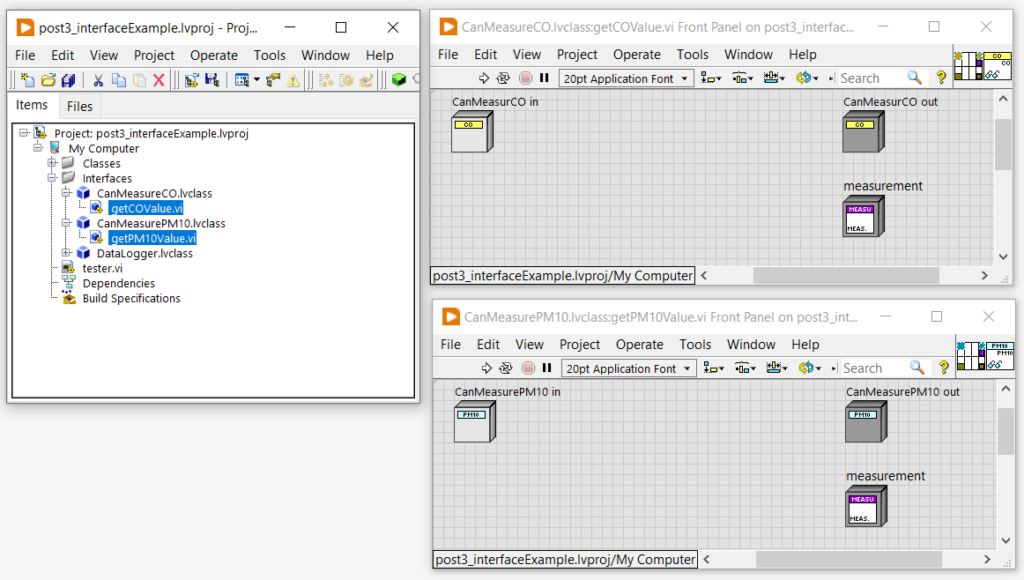
We now move to the classes related to sensor management (Sensor, PM10Sensor and COSensor classes) and their associated interfaces (CanMeasurePM10 and CanMeasureCO).
The two interfaces CanMeasurePM10 and CanMeasureCO define the GetPM10Value and GetCOValue methods, respectively. Both methods return a Measurement type object:
{
public Measurement GetPM10Value();
}
public interface CanMeasureCO
{
public Measurement GetCOValue();
}
As designed, the Sensor class defines the Name, SerialNumber and LastCalibration properties and the Calibrate method:
{
public string Name { get; set; }
public string SerialNumber { get; set; }
public DateTime LastCalibration { get; set; }
public Sensor(string serialNumber, string name)
{
this.SerialNumber = serialNumber;
this.Name = name;
}
public virtual void Calibrate()
{
// Calibrate
this.LastCalibration = DateTime.Now;
}
}
We conclude the implementation of the part dealing with sensors with the two derived classes PM10Sensor and COSensor. The two implement the CanMeasurePM10 and CanMeasureCO interface, respectively:
{
public PM10Sensor(string serialNumber, string name) :
base(serialNumber, name) { }
public Measurement GetPM10Value()
{
return new Measurement(new Random().Next(0,100),"ug/m3", this.Name);
}
}
public class COSensor : Sensor, CanMeasureCO
{
public COSensor(string serialNumber, string name) :
base(serialNumber, name) { }
public Measurement GetCOValue()
{
return new Measurement(new Random().Next(0, 60), "mg/m3", this.Name);
}
}
We now turn to the implementation of the AirMonitoringStation class and derived classes.
The abstract class AirMonitoringStation is a simple container of the Location and Name data:
{
public string Location { get; set; }
public string StationName { get; set; }
protected AirMonitoringStation(string location, string stationName)
{
this.Location = location;
this.StationName = stationName;
}
}
As designed, we derive two classes from AirMonitoringStation: MainStation and PeripheralStation.
The PeripheralStation class, in addition to being derived from AirMonitoringStation, implements the two defined interfaces also used for sensors (CanMeasurePM10 and CanMeasureCO):
{
public PeripheralStation(string location, string stationName) :
base(location, stationName) { }
public Measurement GetCOValue()
{
return new Measurement(new Random().Next(0, 60), "mg/m3", this.StationName);
}
public Measurement GetPM10Value()
{
return new Measurement(new Random().Next(0, 100), "ug/m3", this.StationName);
}
}
The MainStation class, on the other hand, is a bit more complex. As defined in design, the class depends on the CanMeasurePM10 and CanMeasureCO interfaces and has two separate methods for reading PM10 and CO, respectively:
{
public MainStation(string location, string stationName) : base(location, stationName) { }
public List<CanMeasureCO>? COSources { get; set; }
public List<CanMeasurePM10>? PM10Sources { get; set; }
public List<Measurement>? GetPM10Values()
{
if (this.PM10Sources is null)
{
return null;
}
var measurementList = new List<Measurement>();
foreach (var item in this.PM10Sources)
{
measurementList.Add(item.GetPM10Value());
}
return measurementList;
}
public List<Measurement>? GetCOValues()
{
if (this.COSources is null)
{
return null;
}
var measurementList = new List<Measurement>();
foreach (var item in this.COSources)
{
measurementList.Add(item.GetCOValue());
}
return measurementList;
}
}

We finally proceed to the logging part by creating the DataLogger interface that defines the LogData method. The LogData method receives the date string parameter as input:
{
public void LogData(string data);
}
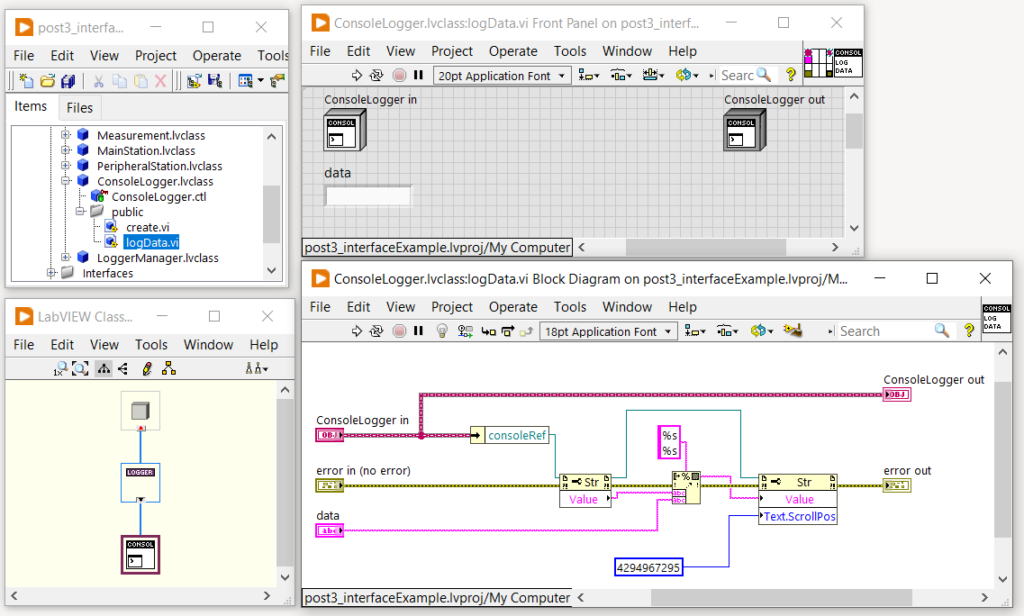
The DataLogger interface is implemented by the ConsoleLogger class responsible for writing the data to be logged in the system console. Note that for the LabVIEW version, where the console is not natively supported, the console itself is simulated by writing in a string indicator.
{
public void LogData(string data)
{
Console.WriteLine($"New record: {data}");}
}
}
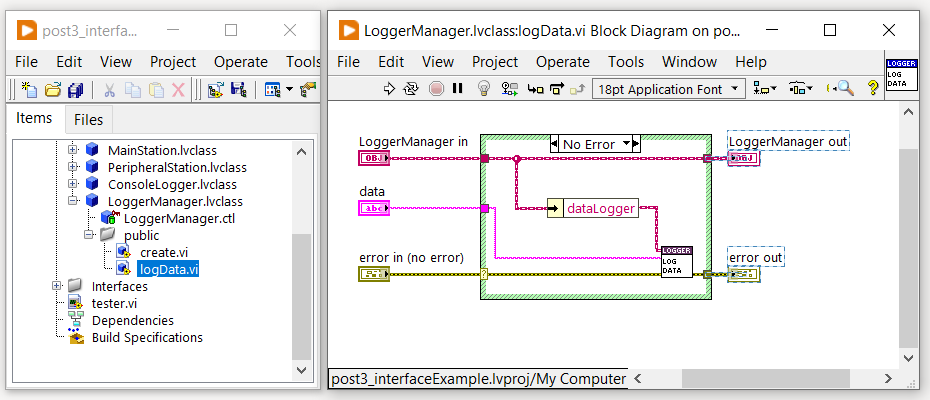
We then have the LoggerManager class that handles the logging operation. The class does not depend on concrete classes but on the DataLogger interface. Through the constructor (or the Create method for LabVIEW) we inject the concrete object (in our case the ConsoleLogger object).
{
private DataLogger logger;
public DataLoggerManager(DataLogger logger)
{
this.logger = logger;
}
public void LogData(string data)
{
this.logger.LogData(data);
}
}
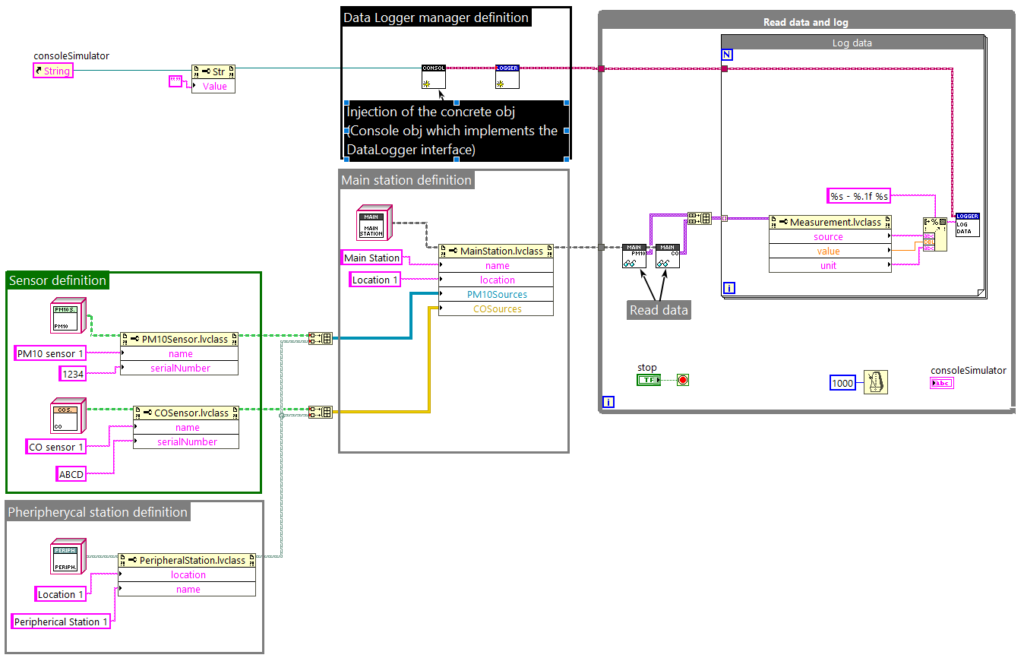
Let’s finish the example by creating the main application that brings together all the classes and interfaces created above.
The program initializes objects of type MainStation, PeripheralStation, PM10Sensor, COSensor, and ConsoleLogger. The latter is then injected into the object of type LoggerManager.
The PM10 source list for the MainStation object consists of the PM10Sensor and the PeripheralStation object. Similarly, the CO data source list consists of the COSensor sensor and again the PeripheralStation object.
Finally, at regular intervals, the program queries the PM10 and CO sources and logs the data via the LoggerManager object.
{
static void Main(string[] args)
{
// Initialization of Stations
var mainStation = new MainStation(location: "location 1", "Main Station");
var peripheralStation = new PeripheralStation(location: "location 2", "Peripherical Station 1");
// Initialization of Sensors
var myPM10Sensor = new PM10Sensor(serialNumber: "1234","PM10 sensor 1");
var myCOSensor = new COSensor(serialNumber: "ABCD", "CO sensor 1");
// Initalization of the LoggerManager obj
var loggerManager = new DataLoggerManager(new ConsoleLogger());
// Assignement of PM10 and CO sources to the mainStation
mainStation.PM10Sources = new List<CanMeasurePM10> { myPM10Sensor, peripheralStation };
mainStation.COSources = new List<CanMeasureCO> { myCOSensor, peripheralStation };
while (!Console.KeyAvailable)
{
// Return and log PM10 values
foreach (var measurement in mainStation.GetPM10Values())
{
loggerManager.LogData($"{measurement.Source} - {measurement.Value} {measurement.Unit}");
}
// Return and log CO values
foreach (var measurement in mainStation.GetCOValues())
{
loggerManager.LogData($"{measurement.Source} - {measurement.Value} {measurement.Unit}");
}
Thread.Sleep(1000);
}
}
}
And here is the working example:
This example concludes the discussion on interfaces and their uses. Thank you for taking the time to read this article. I hope that the concepts exposed are sufficiently clear and can be helpful in solving real-world problems. In case of doubts, requests or plain curiosity, I am available here.
Below you’ll find the direct link to download the LabVIEW project (2023 version) together with some other links on the use of interfaces (including but not limited to LabVIEW).
See you in the next post!